DIY pom pom garlands
Lillian Ortiz,
16th Jul 2019
Tags:
Life
Blog
Summer
School is out. For some of you, that may mean a fun-filled summer packed with various activities and summer camps.
For others, that may mean long, lazy, restful days chilling at home, enjoying the gift of increased free time with family and friends.
Maybe your summer will be comprised of a little of both.
Either way, today's easy 'Do-It-Yourself' activity is something I think we all might enjoy trying this summer.

These pom pom garlands are perfect for decorating your space this summer. Whether you are staying in a dorm room, a cabin at your summer camp, or you just want to give your bedroom decor an update, this is a must try.
It takes very little time and skill, and requires minimal materials.
It is amazing how just a little pop of color here and there can really liven up a place.

And to all my fellow crafters out there who, like me, have an exorbitant amount of abandoned skeins of yarn lying around, this craft is the perfect project for using them all up!
THE MATERIALS NEEDED:
- Yarn. You can go for the classic look and make your pom poms all the same color, or mix it up if you have multiple skeins of yarn of differing colors.
- String. A lightweight yarn, cross-stitching thread, etc. Must be able to thread it through a needle.
- A sewing needle.
- Scissors. Please handle it responsibly.
- A fork. Yes, that's right, the eating utensil. The bigger the fork, the bigger the pom poms.


Step 1:
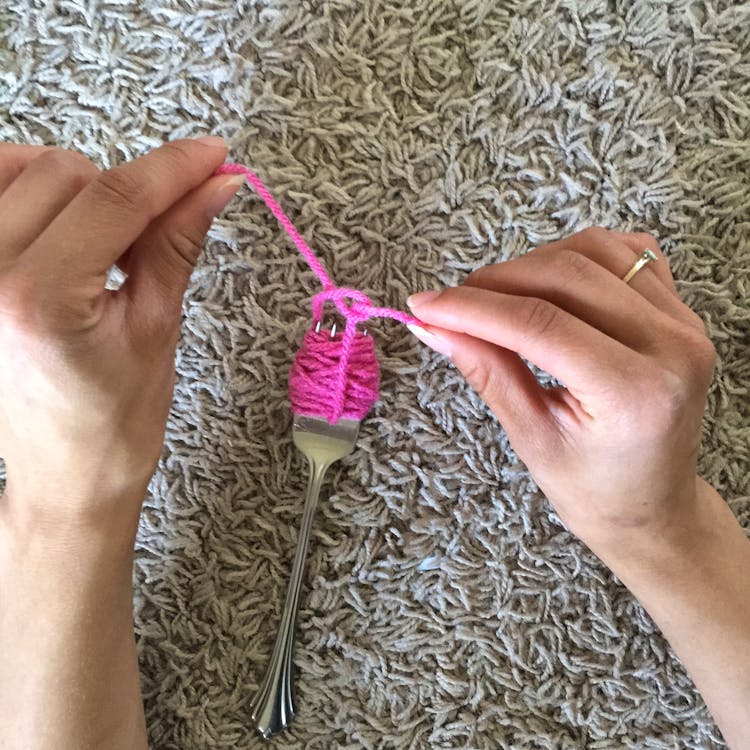
To make your first pom pom, take your yarn and wrap it tightly around the tines of your fork about 50 to 70 times around.

STEP 2:
Cut another piece of yarn long enough to tie around the bundle of yarn you've just made on the fork.
The bundle still wrapped around the fork, take your piece of string and thread one end through one of the central slots of the fork underneath the wrapped bundle.
Then thread the other end of your piece of string through the same slot, but above the wrapped bundle.
Bring the ends together to tightly tie up the bundle, making a knot.


Step 3:
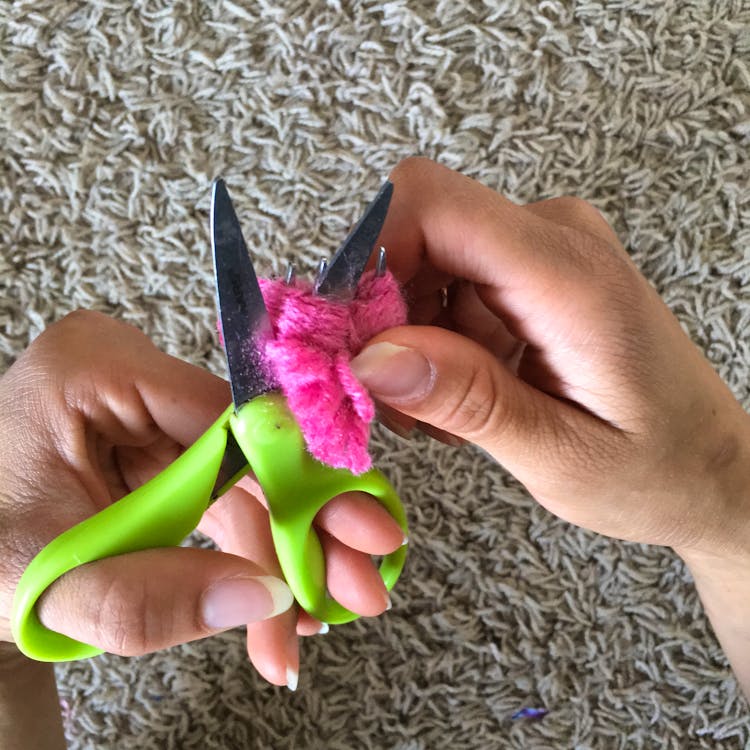
You are now going to cut your bundle on each side of the tie.
Carefully slip one of the blades of the scissors into your bundle where your fork once was and cut. Repeat on the other side.
Pictured below, I chose to remove the bundle from the fork and then cut. You may choose to cut the bundle while still on the fork, which may help with stabilization if you can manage to pass the scissors through the bundle with the fork still inside.


Step 4:
You are on your way to having a beautiful, homemade, organic-looking pom pom.
Simply fluff it up and trim where necessary, including the string you used to tie up your bundle.
Be careful not to pull on any one piece of yarn to strongly in any one direction, which may cause your pom pom to come apart.

Step 5:
Prepare your string by making it the desired length for which you want your garland to be.
Make however many pom poms you want to be displayed on your garland.
Finish by simply using your needle to string your pom poms on to your prepared strand to form your garland.
Have fun making these garlands putting them all over, everywhere, and anywhere you want too.


Thanks for reading. Now go get crafting!


